Set up a plan for a practitioner's availability for appointments.
Procedure
-
Select .
-
In the Practitioner Setup window, select the
Appointments tab.
-
Within the Practitioners section, select the practitioner for whom you want to configure a plan.
-
Click Plans. The Plan Configuration
window appears.
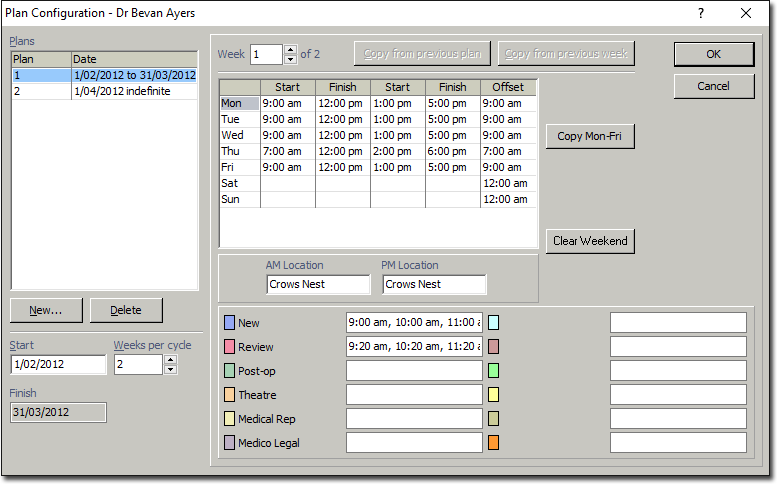
- The example above indicates that this is the plan configuration for Doctor
Ayres. The configuration contains two plans. Currently, Plan 1 is selected, and
its details are displayed in the main body of the window.
- The first plan is a series of weeks, spanning the period from 1/02/2012 to 31/03/2012, after which Plan 2 commences. In the example above, the details for Week 1 are displayed, because Week 1 (of 2) is currently selected at the top of the window.
- Plan 2 is not superseded by a third plan, so its end date is undefined,
and hence indefinite.
- Each week within a plan cycle can have its own settings.
- To edit a plan, select it from the Plans list on the left side of the window.
Information on editing follows, below.
- To copy a previous plan, select the plan you want to copy the settings to.
Click Copy from previous plan.
-
To create a new plan, click New. The new plan is added to
the list of plans. The new plan's start date defaults to one day after the preceding
plan's end date.
-
(Optional) Change the start date of your plan by entering a new date into the
Start field. If you change the start date of a plan, Bluechip automatically
adjusts the end date of the preceding plan to compensate. Bluechip does not allow
time gaps between two consecutive plans.
-
(Optional) Change the number of weeks within your plan cycle. The example above
indicates that Plan 1 is a two-week cycle. The default is 1.
-
To edit a week in a plan, enter the week number in the Week
text box at the top of the window. The example above indicates that week 1 of 2 is
selected for editing. After selecting the week you want to edit, its settings will be
displayed.
- To copy the settings from a previous week to the current week, select the week
you want to copy settings to, and then click Copy from previous
week.
-
For each day of the week, enter the practitioner's start and finish times for the
morning and afternoon sessions. The image above indicates that Doctor Ayres commences
on Monday morning at 9:00 AM, finishing at 12:00 PM. He then has a break for 1 hour,
commencing his afternoon session at 1:00 PM. and continues through until 5:00
PM.
- You can copy the settings for Monday to Tuesday through Friday, by clicking
Copy Mon-Fri.
- You can clear the weekend of Start and Finish times by clicking
Clear Weekend.
-
(Optional) Enter an offset time for each day. The offset time refers to the first
time period displayed in the Appointment Book when you open it. If you do not define
an offset time, Bluechip uses the default time of 9:00 AM, so when you open the Appointment
Book, the first time displayed will be 9:00 AM. For example, this might be
inconvenient for sites where your appointments commence at 9:00 AM because, when you
open the Appointment Book, you would have to scroll down to the 9:00 AM slot to view
your first appointments for the day. If you set an offset time of 8:00 AM, your 9:00
AM appointments would be clearly visible at the top of the Appointment Book window
and you would not need to scroll down to locate them.
-
(Optional) For each day, enter the practitioner's location for the morning and
afternoon sessions in the AM Location and PM
Location boxes.
-
(Optional) For each appointment type, enter a range of times that the practitioner
is available. The example above indicates that Doctor Ayres is available for new
appointments at 9:00 AM, 10:00 AM and 11:00 AM.
-
Click OK.
Results
A plan is created that sets up the days, times, and locations where the practitioner
is available for different types of appointments.