Configure older EFTPOS devices for use with Bluechip.
Procedure
-
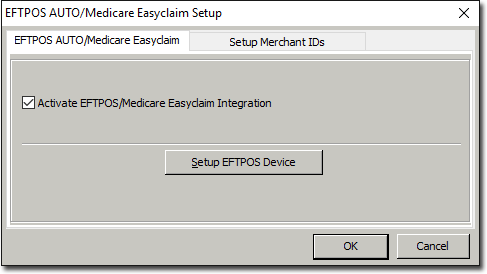
Select .
-
In the EFTPOS AUTO/Medicare Easyclaim Setup window, tick the
Activate EFTPOS/Medicare Easyclaim Integration check
box.
-
Click Setup EFTPOS Device.
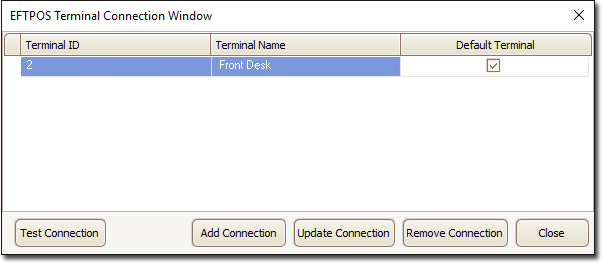
-
In the Terminal Connection window, click Add
Connection.
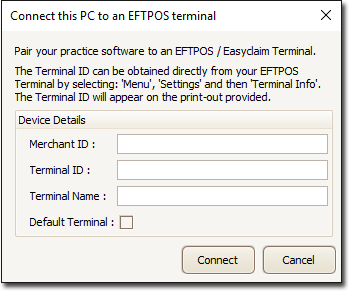
-
In the Connect PC to an EFTPOS Terminal window, enter your
Merchant ID as supplied by TYRO ( on the device).
If your practice has multiple merchants/practitioners, you only need to enter the
first Merchant ID; the system will automatically connect all other merchants.
Enter the Terminal ID for the EFTPOS Terminal connected to your computer network.
The Terminal Information is supplied by TYRO, and is accessible via the EFPTOS
Terminal by selecting on the Device (each EFTPOS Terminal connected to your network has a
unique ID).
-
Create and enter a Terminal Name for the EFTPOS Terminal. This is usually something
that identifies the EFTPOS Terminal from others (i.e. Front Desk). It is advisable to
create a unique name for each of your EFTPOS Terminals.
-
(Optional) Tick the Default Terminal check box to indicate
that this particular EFTPOS terminal will be the default used for processing EFTPOS
receipts on this computer. This is particularly handy if you have multiple EFTPOS
terminals at your practice. This setting can be changed later if required.
Results
The EFTPOS device is ready for use with Bluechip.