Print a Statement Run
Before you begin
Procedure
- Ensure that you have no files open.
-
Either:
- Click
- Press Ctrl + P
- Select
- Click
- In the Print Report window, select Statement from the list of reports and click Next.
-
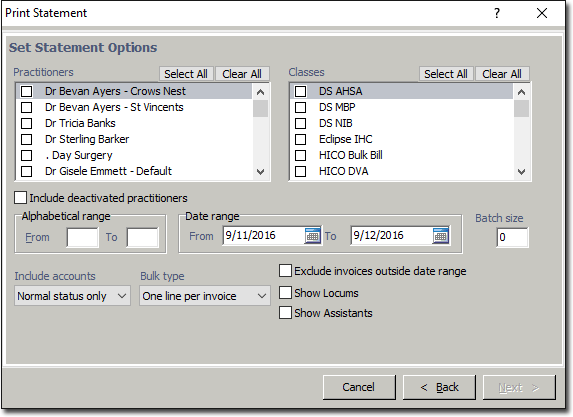
In the Print Statement window, select the Practitioners at
each location that you would like included in the run. To easily select all
Practitioners and locations, click Select All.
- Select the classes of patient you would like included in the run. To easily select all classes, click Select All.
- If you want to select a particular range of patients alphabetically, enter those letters in the Alphabetical range fields.
- Enter the date range for the run. The standard procedure is to leave the From field blank, and to backdate the To field by 30 days.
- If you are aware that the statement run will be quite long, then enter a figure between 20 and 50 in the Batch size field.
- Select Normal status only, Bad debts only or All from the Include accounts section.
- From Bulk type, choose from One line per invoice, All invoice items and One page per patient. This option is activated when printing statements for debtors that have amounts outstanding for multiple patients. One line per invoice and All invoice items both will generate a single statement for the debtor, with each patient listed on that statement; All invoice items is more comprehensive, as it is fully itemised. One page per patient is the preferred option for statements involving Medico Legal, Workers Compensation and Third Party types of claims, as a separate statement is generated for each patient, with required details such as Claim No's, and so forth.
- If Exclude invoices outside date range is selected, a statement will not include any debts that were incurred by the debtor outside the specified date range.
- Click Next.
- Ensure that the correct printer, tray and number of copies are selected, and then click Next again to print the report.